1) Install IIS
- Go to control panel (right click windows icon, then control panel).
- Go to Programs.
- Go to Programs and Features.
- Go to Turn Windows features on or off.
- Click Internet Information Services.
- The checkbox should now be a box and not a check.
- Open the checkbox by clicking on the "+"-> open World Wide Web Services -> open Application Development Features.
- Now check the boxes as per the image below:
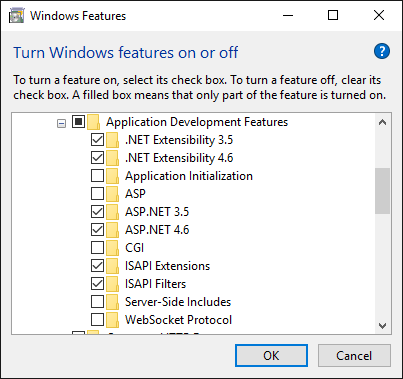
9. Click OK, you may need to restart the computer.
2) Set up web deploy
- Download: {+}http://go.microsoft.com/?linkid=9817356+This link does not open a webpage, but downloads an .exe installation file.
- Run and click install.
- Click exit afterwards.
3) Prepare SQL Server Management Studio (if you already have this installed go to 3.2, so only skip 3.1)
- Download and install SQL Server Management Studio.
- Connect to the SQL Server and right click the server in your object explorer (located on the left) and click properties.
- Go to security and make sure Server authentication is set to SQL Server and Windows Authentication mode. If it is not yet set to SQL Server and Windows Authentication mode, continue with step 3.4). Else, continue with step 3.9).
- If you change this, you will need to restart your server, do this by opening task messenger (ctrl + shift + esc).
- Go to the Services tab.
- Find MSSQL${your server version}.
- Then right click and press stop, don`t press restart this goes too fast and will therefore not be effective.
- Then right click again and start it again.
- Go back to SQL Server Management Studio and open the folder called Security under your server in the Object Explorer.
- Then go to Logins and double click sa.
- Setup a password.
- Go to Status and make sure that the Login is Enabled.
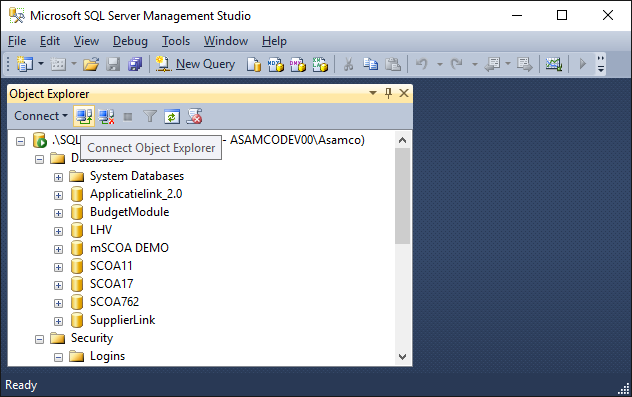
- Try if it worked by clicking the connect button, see screenshot below.
14. Then select SQL server Authentication instead of Windows authentication and login using the sa credentials, if you are logged in its correct, if not refollow the steps above starting from 3.2.
4) Download the application
- Use the following URL to download the latest version of the MPBM app: www.asamco.com/Software/MPBM/MPBM.zip
- Locate the file you just downloaded and extract the files from the MPBM.zip file.
5) Install the application
- Open the MPBM folder you just extracted from the MPBM.zip file.
- Locate the installation script file called "Install_MPBM_V14.ps1". The V14 may vary, because we update this number as we keep updating the installation script. Right click and select Run with Powershell. Click Open. A message will be displayed: "Do you want to allow the app to make changes to your device?" Click yes.
- Powershell will now run and prompt you with the following questions. Generally, following the bold commands here will be enough.
The script will run and prompt you with the following questions:
- What is the IIS Web Application Name? Default is: Default Web Site\MPBMApi.
Press Enter to accept default. Usually this is the way the Api is deployed. If this is different for a specific installation, type: websitename\applicationname and press Enter.
- What is the IIS Web Application Pool Name? Default is: MPBM.
Press Enter to accept default. The AppPool under which the application runs. Default is recommended, change the name if needed.
- What is the IisVirtualDirectoryPhysicalPath? Default is: C:\inetpub\wwwroot\MPBMApi.
Press Enter to accept default. The folder where the api is actually deployed. Type the full path to the folder if this is different from the one displayed.
- What is the name of the sql server?:
The name of the sql server instance where the BudgetModule, SCOA and working databases are deployed. Example: BOJANALA\SQL2014. *We recommend that you copy + paste this name from SQL Management Studio. Right click on the instance name as shown below, click on connect, copy the full server name as per the second image below. If control + V does not work, try hitting the right mouse button to use the paste function.*


What is the password of the sa user?:
- Example: camelsa@123. Enter your own sa password for SQL Server here.
- What is the name of the sql server where the EvolutionCommon database is located?:
The name of the sql server instance where EvolutionCommon database is deployed. Example: BOJANALA\SQL2014. We recommend that you copy + paste this name from SQL Management Studio. If control + V does not work, try hitting the right mouse button to use the paste function.
- What is the password of the sa user?:
Example: camelsa@123. Please note that the first SQL Server instance + password can be different from the second one, of the EvolutionCommon database is located on another server. Enter your own sa password for SQL Server here.
- What is the Evolution Common Database Name? Default is: EvolutionCommon.
Press Enter to accept default. If the Evolution Common Database does not have the standard name (EvolutionCommon), enter that name here. Otherwise, hit Enter to accept default. The script will at this point test the sql connection. If it fails you have the possibility to reset the name and retype the password. If you do not want to continue testing the connection, type ‘skip’ and press Enter.
Here is a screenshot of my installation script at this point. Please use this for reference purposes only (do not copy any information, because you need to specify the information specifically for you machine / situation).

- Do you want to back up the databases of this app before installation? [Y] Yes [N] No (Default is “N”):
Hit Y or N + Enter
- Do you want to perform database validation on the databases [Y] Yes [N] No (Default is “Y”):
Hit Y + Enter. This will check the databases on errors. The script will then continue to install the Api . After this is done, you will be prompted with a similar set of questions for the App installation:
- What is the application name? Default is: MPBMApp.
Press Enter to accept default. You can specify an alternative name to the frontend application here. We recommended using the default.
- What is the application pool? Default is: MPBM.
Press Enter to accept default. You can specify an alternative application pool here. We recommend using the default. If you do not use the default, we strongly recommend using the same application pool as the MPBMApi.
- What is the IIS website? Default is: Default Web Site.
Press Enter to accept default. You can specify the website the application should be deployed under. We recommend using the default. If you do not use the default, we strongly recommend using the same website as the MPBMApi.
- What is the physical path? Default is: C:\inetpub\wwwroot\MPBMApp.
Press Enter to accept default. This specifies the location where the files of the frontend application should be stored. We recommend using the default. The script will then continue to install the frontend application. After this you will be prompted:
- Please enter the host address as either an ip address, computername or the 'localhost'. Defaulted to: Your Computername.
Press Enter to accept default. This settles the hostname in the connectionstrings in the config.json file of the app. Recommended is to keep the default. If you are using a specific port for the Api server, put it behind your computername here. For example, Computername:8080. Port :80 is standard and does not have to be specified. In some cases, the computer name may give issues due to the DNS not being able to pick up the right computer name. In that case, try using the IP address instead. To get your machine's IP address, hit windows sign + R ? type "cmd" ? a command window will pop up, type "ipconfig" and hit enter ? Look for the address behind IPv4 Address (it will look like the following: 192.168.1.155. Type this number (including the dots) in the Powershell window of the MPBM installation.
- Would you like to restore the SCOA database?
With every update that features an update of the SCOA database, you can restore the new SCOA database. Simply press "Y" and Enter, to restore the SCOA database, or press "N" and Enter if this is not necessary. If a SCOA database is already in your SQL Management Studio, press "N" and hit Enter.
- Type the name of any database for which you like to create a new connection string or press ENTER to continue:
Type the name of the mSCOA database you would like to create connection strings for. Please note that these databases need to be present in SQL Management Studio. It is recommended to copy + paste the name from SQL Management Studio here. Hit Enter when you are ready. The installation is now finished. Press Enter to exit.
Here is a screenshot of my installation script at this point. Please use this for reference purposes only (do not copy any information, because you need to specify the information specifically for you machine / situation).

6) Check whether the installation was successful
- Open Google Chrome and enter the computer name / ip address you just entered in the installation script (step 5.3), followed by /MPBMApp/#/Login. It will look something like this:
http://bas-pc:8080/MPBMApp/#/Login or http://192.168.1.155:8080/MPBMApp/#/sdbip. Please remember that the port (in this case :8080) is only nescesarry if your app is indeed listening to a specific port.
2. Click on server setting and select your SQL server.
3. Log in with the username and password.
4. If all is correct, you will be able to use the application now. If not, please consult the MPBM manual with known errors.
Related articles