This guide explains in detail how to install and configure the DET for CCG.
- Install the DET
- Download and install the following setup file:
www.asamco.com/Software/DataExtractionTool/SetupDataExtractionToolv3.8.0.exe
- Do not run it yet after the installation!
- Make sure you run the DET as Administrator to get priviliges for creating the SQLLite database (right click → run as administrator).
- Download and install the following setup file:
- Configure the DET
- Register the DET
- The first time you run it (AS ADMINISTRATOR!) you must register the DET:
- Fill in the name. Use the customers name + location. E.g. "CCG - Nongoma"
Request the password from Asamco
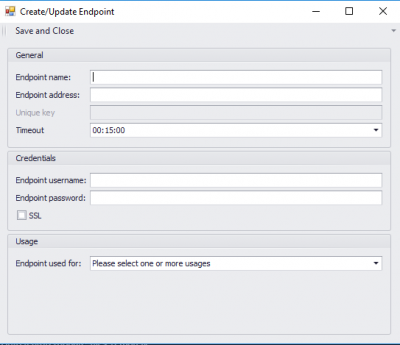
- In case you want to use another endpoint click the add button. These settings need to be provided:
- Endpoint name - The name for the endpoint: "mSCOA DET"
- Endpoint Address - The address on which the endpoint is available: "https://mscoa.net/DataExtractionService/TransferService.svc"
- Credentials:
Username: Request the username from Asamco
Password: The password to use to authenticate on the webservice. Request the password from Asamco
- Credentials:
- Register the DET
- SSL: Determines if SSL should be enabled for the new endpoint (check the checkbox).
b. Configure global settings
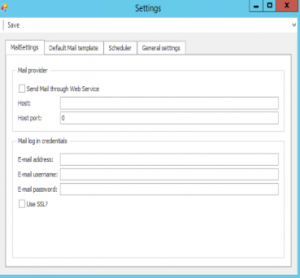
- Go to the Settings tab at the top of the application and click: Global settings
- In the first tab - MailSettings - the mailsettings needs to be set up. Request these settings from Asamco.
- In the second tab (Default mail template) you need to use the following settings (this is an example!)
This template only works for backup tasks!
- Mail To: request this email address from Asamco
- Subject: [BU-CCG] Backup task: %%BaseTask.Name%% - %%BaseTask.ResultText%% - %%BaseTask.DatabaseName%%
- Body:
Hello!

We've backupped your database. Or at least tried. See below for the details.
Errors found (yes/no): %%BaseTask.HadErrorLastRun%%
General info:

Task name: %%BaseTask.Name%%
Database: %%BaseTask.DatabaseName%%
Backup date: %%BaseTask.LastRunDateTime%%
Zipped file name:  %%BackupTask.FormattedZipName%%
Upload location: %%BaseTask.WebserviceLocation%%
Detailed log:

%%BaseTask.Logs%%
%%BaseTask.ServerInformation%%
%%BaseTask.RunningTime%%

Have a nice day!

The Asamco Team
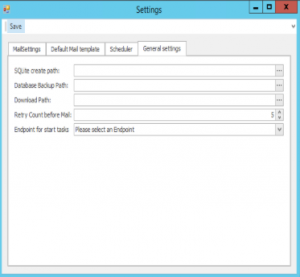
- In the last tab, General settings (skip the third tab), and fill in the following settings (for example):
- SQLite create path: X:\DET\SQLITEDB\
- Database Backup Path: X:\DET\Backup\
These folders are just an example. You may create them elsewhere if prefered, aslong it isn't in Users/Document and Settings!
- Make sure you create those folders before hitting Save
- Now click Save. There should appear a message: Successfully saved Settings!
c. Configure Backup Task
Now we are going to create a new backup task (or when there are multiple live databases, tasks)
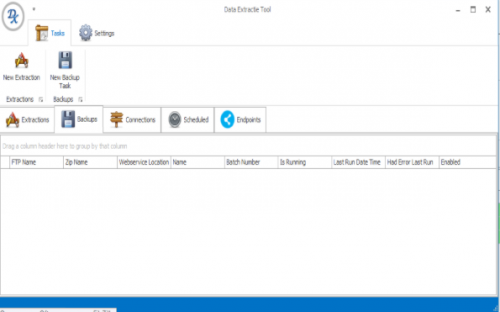
- In the main menu, go to the tab Tasks at the top of the application
- Click the button: new Backup Task
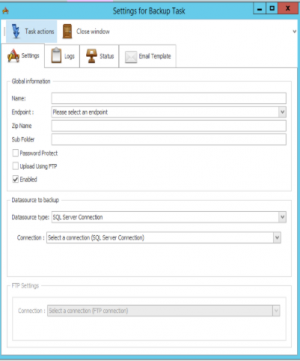
- In the first tab (Settings) fill in the following settings for example:
- Name: Preferable the database name you are going to backup
- Endpoint: Use the Endpoint we just created here
- Zipname: You can fill in the following: (When hovering your mouse above the textbox, you can see the settings)
- {0} The current date in the following format (yyyyMMdd)
- {1} The database name you will backup
- {2} The task name you just filled in
- {3} The batch number
- Subfolder: The subfolder on the webservice you are going to upload the database to. (E.g.: Camelsa\)
- Password protect: If you require a password on the zipped database
- Upload using FTP: Only use this when you want to upload the database to a FTP. Preferably not used
- Enabled: Checked if the tasks should be enabled/activated
- Datasource: Here you select the Datasource you are going to use. (Only SQL Server Connection available at this time)
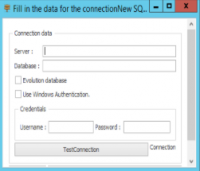
- Connection: Right click and select Add connection:
- Server: Fill in the server. Most of the time localhost or (local)
- Database: Fill in the database you want to backup. E.g. mSCOA - Nongoma
- Fill in the Credentials; Username and Password.
- Click test connection and if Successful click the Save button under it
- Now go to the fourth tab - Email Template and check if everything is correctly copied from the Global Settings you just filled in
- If so click on the button Task actions at the top of the window and click Save Backup Task and after that Close window
d. Configure Polling
In order to retrieve queries that are given through the webservice, the DET must poll the webservice frequently.
- In the main menu, go to the tab Settings and click the button Poll settings
- Check the option: Allow tool for polling
- Select an Endpoint in the dropdown below it
- In the Options window below check all settings; Insert, Update, Delete
- Now in the second tab - Mail template set a template email:
- Mail to: request this emailadress from Asamco
- Subject: [POLL-CCG] CCG-Nongoma - Scheduled task is executed
- Body:
Hello!

We've polled the following query and executed it:

%%QueryTaskWrapper.QueryField%%
%%QueryResultWrapper.Exception%%

Have a nice day!

The Asamco Team
(Make sure you do not use BaseTask items!)
- Now hit the Save button at the top of the window and after that Sync
- Polling is now useable as argument in the Task Scheduler that will be explained in the next section
6. Update Files Mail Template
The following template needs to be used.
- Mail to: request this emailaddress from Asamco
- Subject: [UPD-{CUSTOMER}{LOCATION}] Update Files: %%UpdateFilesTask.Name%% - %%UpdateFilesTask.ResultText%%
- Body:
Hello!

We've updated some files. Or at least tried. See below for details.
Errors found (yes/no): %%UpdateFilesTask.HadErrorLastRun%%

General Info:

Task Name: %%UpdateFilesTask.Name%%
Path Determination Method: %%UpdateFilesTask.PathDeterminationMethod%%
Path Determination: %%UpdateFilesTask.PathDetermination%%
Files:
%%UpdateFilesTask.relativeExtractedFiles%%

Logs:
%%UpdateFilesTask.Logs%%

Kind regards,

The Asamco Team
3. Configure Window Task Scheduler
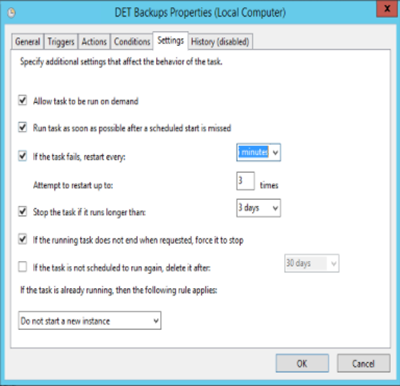
In order to make the database backup daily and poll the webservice every hour, we need windows to run the DET through Task Scheduler:
Make sure you create a seperate task for backup(s), polling and or extraction
- Start Windows Task Scheduler: Under Programs > Accessoires > System Tools
- Create a new Task (Create Task) in the left pane
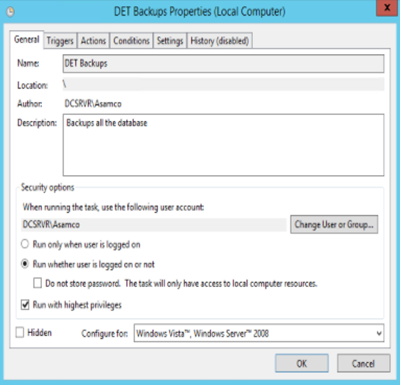
- Set a name for the Task. E.g. DET - Backup or DET - Polling
- Select the option: Run whether user is logged on or not
Where this option is located differs between Windows versions
- Under Triggers click the button New...
- Select the option: Daily and change the start time to e.g. 23:00 (11:00PM)
- When creating a Polling task select Repeat task evrey: and make sure it's set every 1 hour, for a duration of: Indefinitely
- The action it needs to do is Start a program
- Let it start the DET. The usual location is C:\Program Files\Asamco\Data Extraction Tool\DataExtractionTool.exe
- Use as argument one of the following per task:
- For backup use: Backup All
- For polling use: Polling
- For all extraction tasks: Extraction All
- And make sure it runs with the highest privileges. This is a checkbox option in the General tab
Related articles

