Introduction
LMS is a separate Windows application which seamlessly integrates with Sage Evolution (‘Evolution’), allowing for the control and maintenance of all outstanding loans, without the need of any work being done twice, as all transactions can be posted directly from LMS to Evolution.
Similar to Evolution, LMS has the same customizable grids throughout the application to facilitate the provision of preferred information to every individual user.
Instruction videos
Currencies
Interest types
Loan confirmation
Loan creation
Loan pools
Loan statuses
Mass processing
Sub-transactions
Field descriptions
1. Loan overview
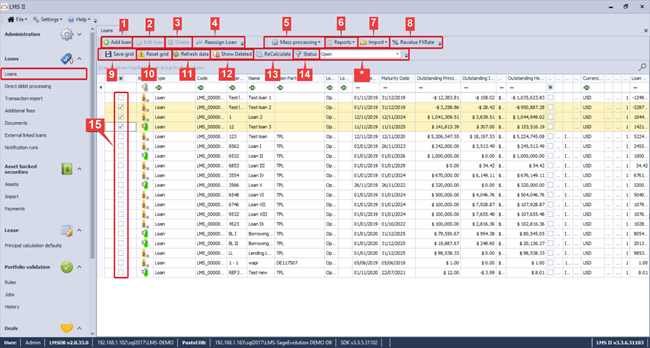
Under “Loans” the following functions are available:
- Add loan: Using this function, new loans can be created.
- Edit loan: Using this function, existing loans can be edited.
- Delete: Using this function, existing loans can be deleted.
- Reassign loan: Using this function, loans can be reassigned, e.g. to other parties (see image below).
- Mass processing: Using this function, transactions for multiple loans can be calculated/processed at once. A selection between posting transactions, calculating interest, and removing transactions can be made (see image below).
- When doing a mass interest calculation, firstly, the interest calculation frequency and end date are to be set (1). Using the “Calculate interest” button (2), the interest can then be calculated, and the according transactions will be displayed (I). After, the desired transactions can be validated, using the “Validate” button (3). Lastly, the validated transactions can be processed, using the “Process” button (4). The processed transactions per loan can be found under the “Transactions” tab of the according loan.
- Reports: Using this function, various reports can be generated by the system. A selection can be made between loan confirmation, loan overview, overview Evolution accounts, loan repayment schedule, loan repayment restructure, direct debit notifications, first reminder and second reminder are available (see image below).
- Import: Using this function, transactions and/or realized foreign exchange can be imported.
- Recalculate FXRate: Using this function, the foreign exchange rate of loan currencies can be revaluated.
- Save grid: Using this function, the data available in the loan overview can be exported to Excel.
- Reset grid: Using this function the loan overview can be reset to the default layout.
- Refresh data: Using this function, the data, displayed in the overview, can be refreshed, e.g. when a new loan has been created but it is not yet displayed in the overview.
- Show deleted: Activating this function allows for displaying all loans, incl. the deleted ones, in the loan overview.
- ReCalculate: Using this function, the selected loans (16) can be recalculated.
- Status: This function allows for filtering the loans, displayed in the overview, by selecting the desired status in the field (15).
- Select loans: Loans can be selected by ticking the checkboxes in front of the according loans.
2. New loan
When creating a new loan, the following information is to be provided.
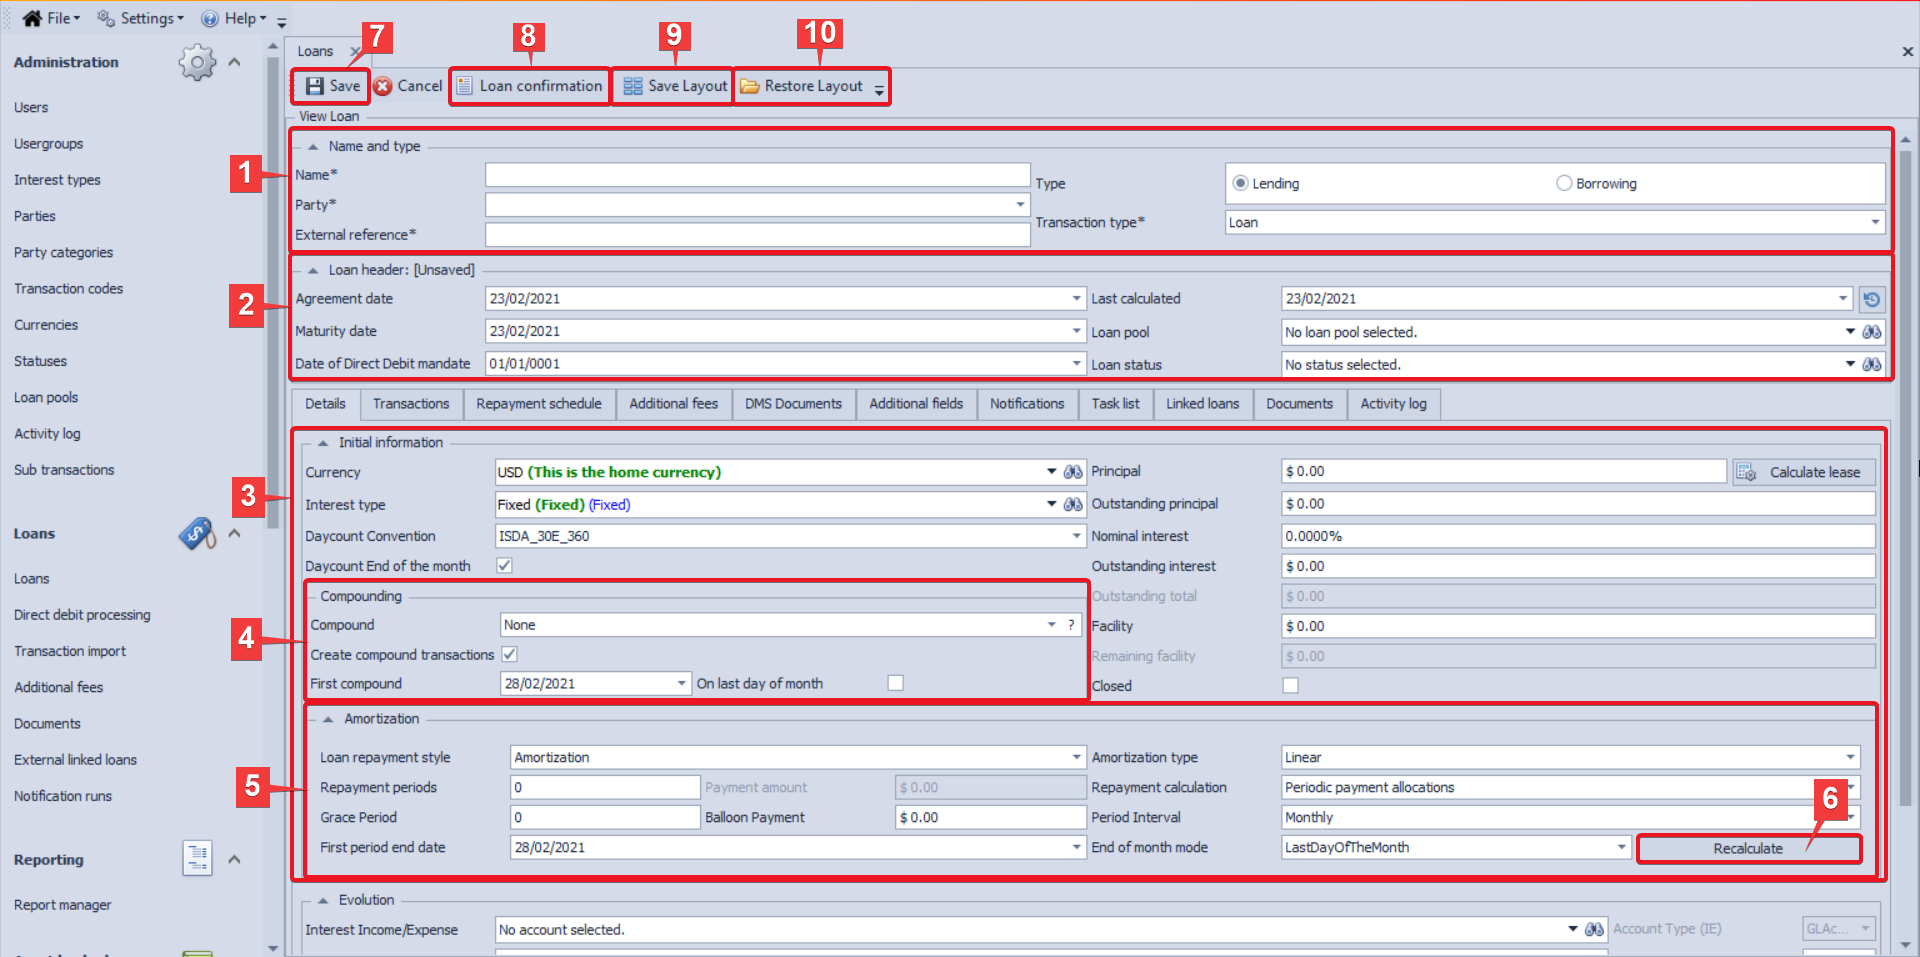
- Name and type
- Name: Name for the loan.
- Party: The party to/from which the loan is issued.
- Loan type: A choice can be made between lending and borrowing.
- External reference: A reference (other than the loan code, generated by the system) to be used in identifying the loan.
- Transaction type: A choice can be made between loan, receivable, car leases and originator.
- Note: For a loan to be saved a name, external reference and party are required. In the event that one or more of these are missing the user will be notified by the system (see image below).
- Loan header
- Agreement date: Date on which the loan is to be agreed on (the beginning of the loan term).
- Maturity date: Date on which the loan period ends.
- Date of direct debit mandate
- Loan status: A choice can be made between active, non-performing, open, suspended, closed, awaiting approval, fully paid, partially paid, repurchased, written off and sold.
- Last calculated: Date on which the loan was last calculated.
- Loan pool (Optional): Using this field the loan can be added to a loan pool (if any).
- Initial information
- Currency: The currency of the loan (the currency in which all transactions are to be handled) is to be set.
- Interest type: A choice can be made between a fixed and other interest type(s).
- Note: Interest types can be added under Administration >> Interest types.
- Day-count convention: The day count convention to be used in calculating interest is to be selected. A choice is available between US_30_60, ICMA_30E_360, ISDA_30E_360, Actual_365_Fixed, Actual_360_Fixed, Actual_ISDA.
- Day-count end of month: This function allows for specifying whether the day-count is to be ended at month-end.
- Principal: The amount of the newly created loan is to be set.
- Outstanding principal (Optional): This amount will automatically be set to the principal amount. It can, however, be modified if the two differ, e.g. if the new loan has been issued before recording it to LMS and has been partially repaid.
- Nominal interest: The nominal interest rate (per period) for the newly created loan is to be set.
- Outstanding interest (Optional): This amount will automatically be set to the interest amount. It can, however, be modified if the two differ, e.g. if the new loan has been issued before recording it to LMS and has been partially repaid.
- Facility: Using this function, a facility for the loan can be set.
- Closed: This function can be used to specify whether the recorded loan has been closed.
- Compounding
- Compound: A choice can be made between none, annual, semi-annual, quarterly and monthly, depending on the compounding frequency (if any).
- Create compound transactions: This function can be used to specify whether compound transactions (if any) are to be automatically created by the system.
- First compound: The date of first compound (if any) is to be set.
- On last day of month: This function allows for specifying whether the day-count is to be ended at month-end.
- Amortization
- Repayment style: For the loan repayment style a choice can be made between amortization and transactions, based on the loan agreement.
- Amortization type (Applicable when Repayment is set to Amortization): Where amortization is applied as a repayment style (5a), a choice can be made for the repayment type between linear, annuity, fixed payment and lease payment.
- Repayment periods/Repayment amount: The total number of repayment periods for the loan is to be set. Alternatively, a repayment amount can be provided when the Amortization type (5b) is set to "Fixed payment" or "Lease payment".
- Grace period: The number of grace periods (if any) is to be set.
- First period end-date: The end date for the first period is to be specified.
- Balloon payment/Residual value: An amount for the balloon payment (if any) is to be set. Alternatively, a residual lease value can be provided when the Amortization type (5b) is set to "Lease payment".
- Repayment calculation: A choice between periodic payment allocations and continued payment allocation can be made. Under the first option, the interest calculation is strictly done, based on the number of periods and the amortization type chosen, while under the second option, the interest is calculated on an ongoing basis, i.e. the interest calculation is based on the actual movement of transactions.
- Period interval: A choice for the period interval is to be made between annual, semi-annual, quarterly, and monthly.
- End of month mode: A selection can be made for the date (day) to be used as end date per period between last workday, last day of the month, and request date. Using the last option, an end date can be set per period, different from the closing-of-the-month date (e.g. 7th).
Recalculate: Using this button, the repayment schedule for the loan can be generated.
- Note: For a repayment schedule to be calculated, Repayment style (5a) is to be set to “Amortization” and the principal amount (3e), nominal interest (3g) and repayment periods or amount (5c) are to be provided. In the event that one or more of these are missing, the user will be notified by the system (see image below).
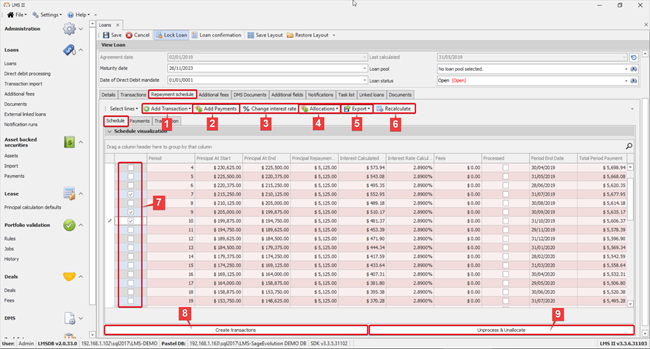
The repayment schedule can subsequently be found under the "Repayment schedule" tab, providing details (per repayment period) of principal amount at the start and end of the period, amounts of principal and interest to be paid for the period, amount of fees applicable per period, period end date and total payment for the period (see image below).
The following functions are further available: (1) Add transactions; (2) Add payments; (3) Change interest rate; (4) Allocations; (5) Export; (6) Recalculate. In the event that an interest rate change is made,
Transactions can be created by selecting the desired periods – by ticking the checkbox in front of each period (7) – and using the "Create transactions" button (8). Accordingly, already processed periods can be unprocessed and unallocated, using the “Unprocess & Unallocate” button (10).
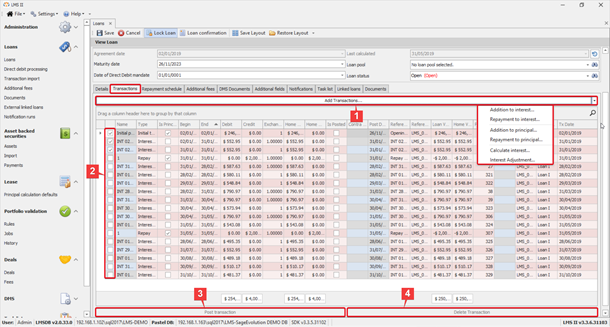
The created transactions can be found under the "Transactions" tab (see image below). Transactions for the according loan can also be added, using the "Add Transactions" button (1) – a choice is available between additions and repayments to interest and principal, and interest calculations and/or adjustments. Further, the created transactions can be posted (3) or deleted (4), by selecting the desired transactions and using the according buttons at the bottom.
- Save: Using this button, the newly created loan can be saved in the system.
- Loan confirmation: Using this function, a loan confirmation report can be generated, by specifying the desired range in time (see image below). The new report can be created (1) and/or an existing report can be edited (2), previewed (3), printed (4) or emailed (5).
- Save layout: Using this function, the selected loan’s layout can be saved.
- Restore layout: Using this function, a layout, previously saved (9), can be restored.
3. Loan fees
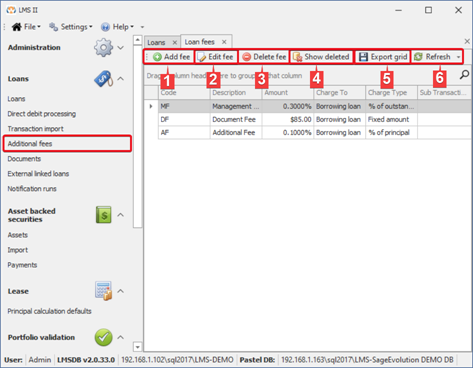
Under "Additional fees" fees can be added and managed. The following functions are available:
- Add fee: Using this function, additional fees can be added.
- Edit fee: Using this function, existing fees can be edited.
- Delete fee: Using this function, existing fees can be removed from the list.
- Show deleted: Using this function, the fees’ overview can be modified to also display fees that have been deleted.
- Export grid: Using this function, the data, displayed in the overview, can be exported to Excel.
- Refresh: Using this function, the data, displayed in the overview, can be refreshed, e.g. when a new fee has been added but it is not yet displayed in the overview.
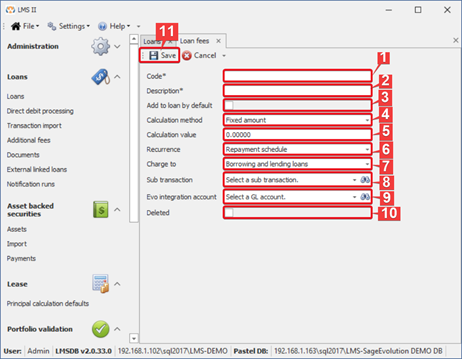
When adding a new fee or editing an existing one, a fee code (1) and description (2) are required (see image below). A choice can be made whether fee is to be added to loans by default (3). The calculation method (4) can consist of a fixed amount or a percentage of full or outstanding principal, payment amount, or the principal repayment amount for the period to which the fee is to be applied. The "Calculation value" field (5) is to be filled in with either the fixed fee amount or the percentage (in percentage terms). Further, the recurrence of the fee (6) can be modified - a choice is available between none, repayment schedule (implying that the fee is applicable to each repayment period), monthly, quarterly, semi-annual, and annual. The fee can be designed as a charge to the lending or the borrowing party, or to both parties (7). The sub-transaction (8) and Evo integration account (9) per fee can also be selected in the according fields. the “Deleted” option (10) allows for marking a fee as removed. Finally, new fees and changes in existing ones can be saved, using the “Save” button (11).
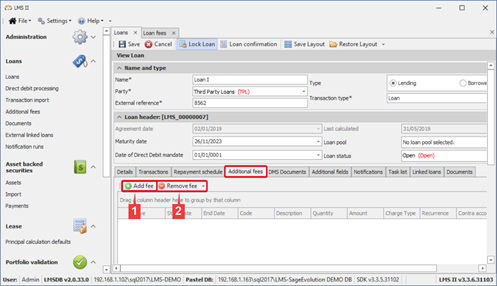
After creating the needed fee options, the according fees can be added to each loan, using the "Add fee" button (1) under the "Additional fees" tab per loan (see image below). Per added fee the period (i.e. start and end date) to which the fee is applicable is to be set. Further, for fees with fixed amounts, a quantity of periods to which the fee is applicable, is required. Fees, already added to a loan, can be removed by selecting the according fee and using the "Remove fee" button (2).







Add Comment