...
- New: Using this function new batches can be added.
- Refresh overview: Using this function refreshes the displayed data, e.g. when new data has been entered in the system and is not yet visible in the overview.
- Reset layout: Using this function resets the layout, e.g. when changes have been made using function 4.
- Column chooser: Using this function allows for the management of columns visible within the overview. Columns can be added by dragging the desired column form from the “Column chooser” box to the desired position in the overview (see image below).
- Options: Using this function allows for activating/deactivating some of the overview functionalities. This can be done, using the checkbox in front of each option (see image below). Changes are saved, using the SAVE button.
- Search: The “Search” field can be used to filter the visible batches.
- Edit cashbook batch: In editing a journal batch, the reference number and workflow can be modified. New rows can be added, using the "+" button.

In editing a batch, the following buttons are available (see image below):

- Post batch
- Validate
- Save
- Batch properties
- Back
- Batch properties: The function allows the user to adjust the details of existent journal batches.


...
The batch can be processed directly, using the PROCESS button in the upper right corner. The newly entered/edited information can be saved, using the SAVE button (2). Using the ← button (3), the user can navigate directly back to the overview without saving any changes made.

9. Proof of delivery
Under "Proof of delivery" various delivery management tools are available.
Under "My trips" a list of the existent trips per user can be found. The following functions are available:
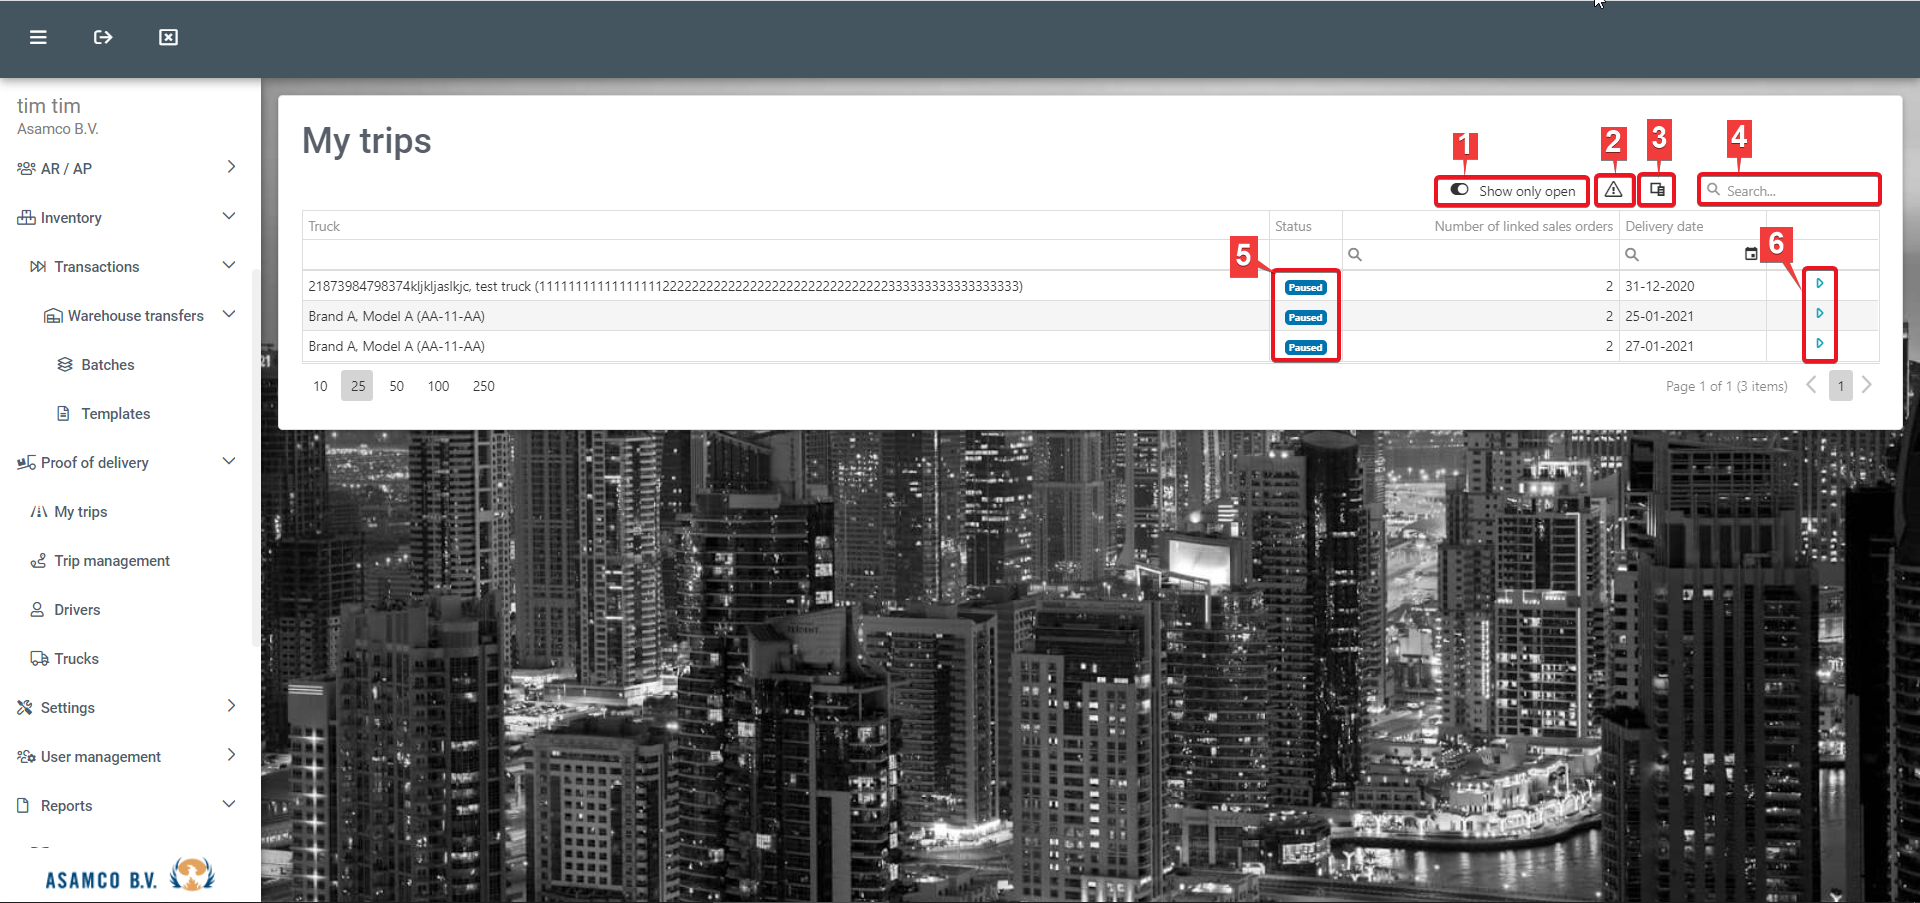
- Show only open: When this filter is activated only open trips are displayed in the overview.
- Reset layout: Using this function resets the layout, e.g. when changes have been made.
- Column chooser: Using this function allows for the management of columns visible within the overview. Columns can be added, using the checkbox in front of each option (see image below).
- Search: The “Search” field can be used to filter the visible trips.
- Status: In the "Status" field, the status of each trip (e.g. paused, completed, cancelled) is displayed.
- Activate trip: This function allows for the user to activate trips that have not been completed or cancelled.

When activating a trip the following options are available:
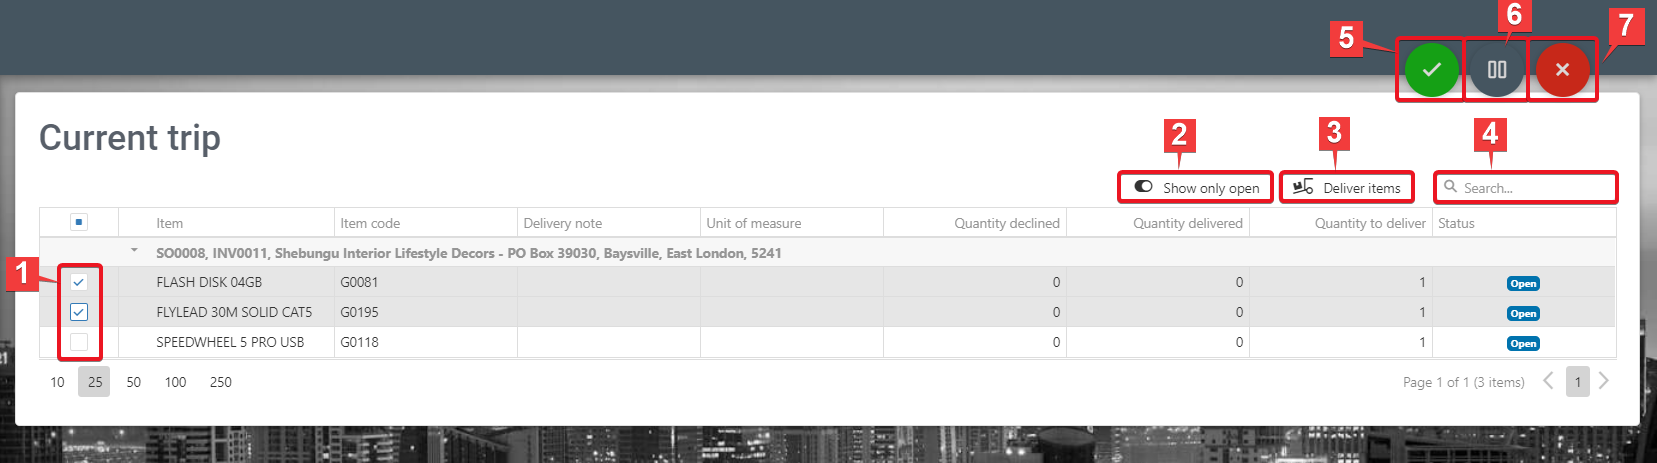
- Choose items: Items can be selected, using the checkbox in front of each item.
- Show only open: When this filter is activated only open items are displayed in the overview, i.e. delivered items are hidden from the list.
- Deliver items: Using this function, the selected items (1) can be marked as delivered.
- Search: The “Search” field can be used to filter the visible items.
- Complete trip: Using this button the trip can be marked as completed.
- Pause trip: Using this button the trip can be paused.
- Cancel trip: Using this button the trip can be cancelled.
Under "Trips" a list of all existent trips can be found. The following functions are available:
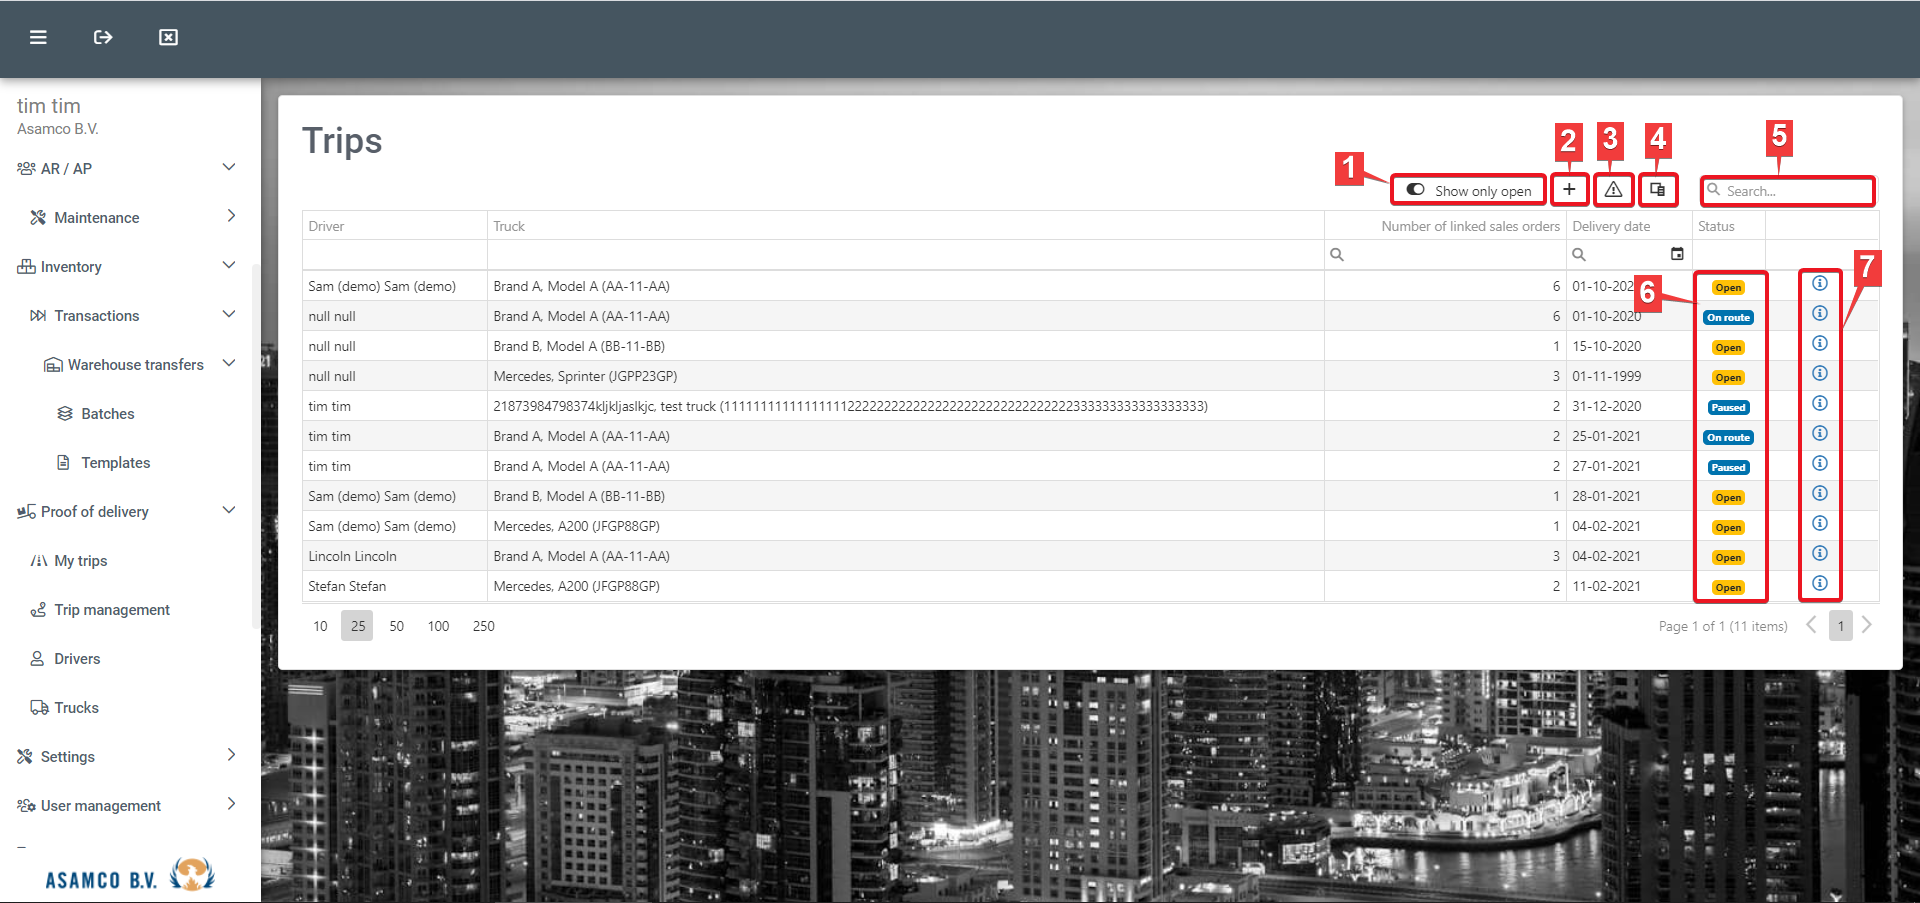
- Show only open: When this filter is activated only open trips are displayed in the overview.
- Create trip: Using this function, new trips can be added to the system.
- Reset layout: Using this function resets the layout, e.g. when changes have been made.
- Column chooser: Using this function allows for the management of columns visible within the overview. Columns can be added, using the checkbox in front of each option (see image below).
- Search: The “Search” field can be used to filter the visible trips.
- Status: In the "Status" field, the status of each trip (e.g. open, paused, completed, cancelled, on route) is displayed.
- View trip: This function allows for the user to activate trips that have not been completed or cancelled.

When adding a new trip and/or editing an existing one, the following options are available:
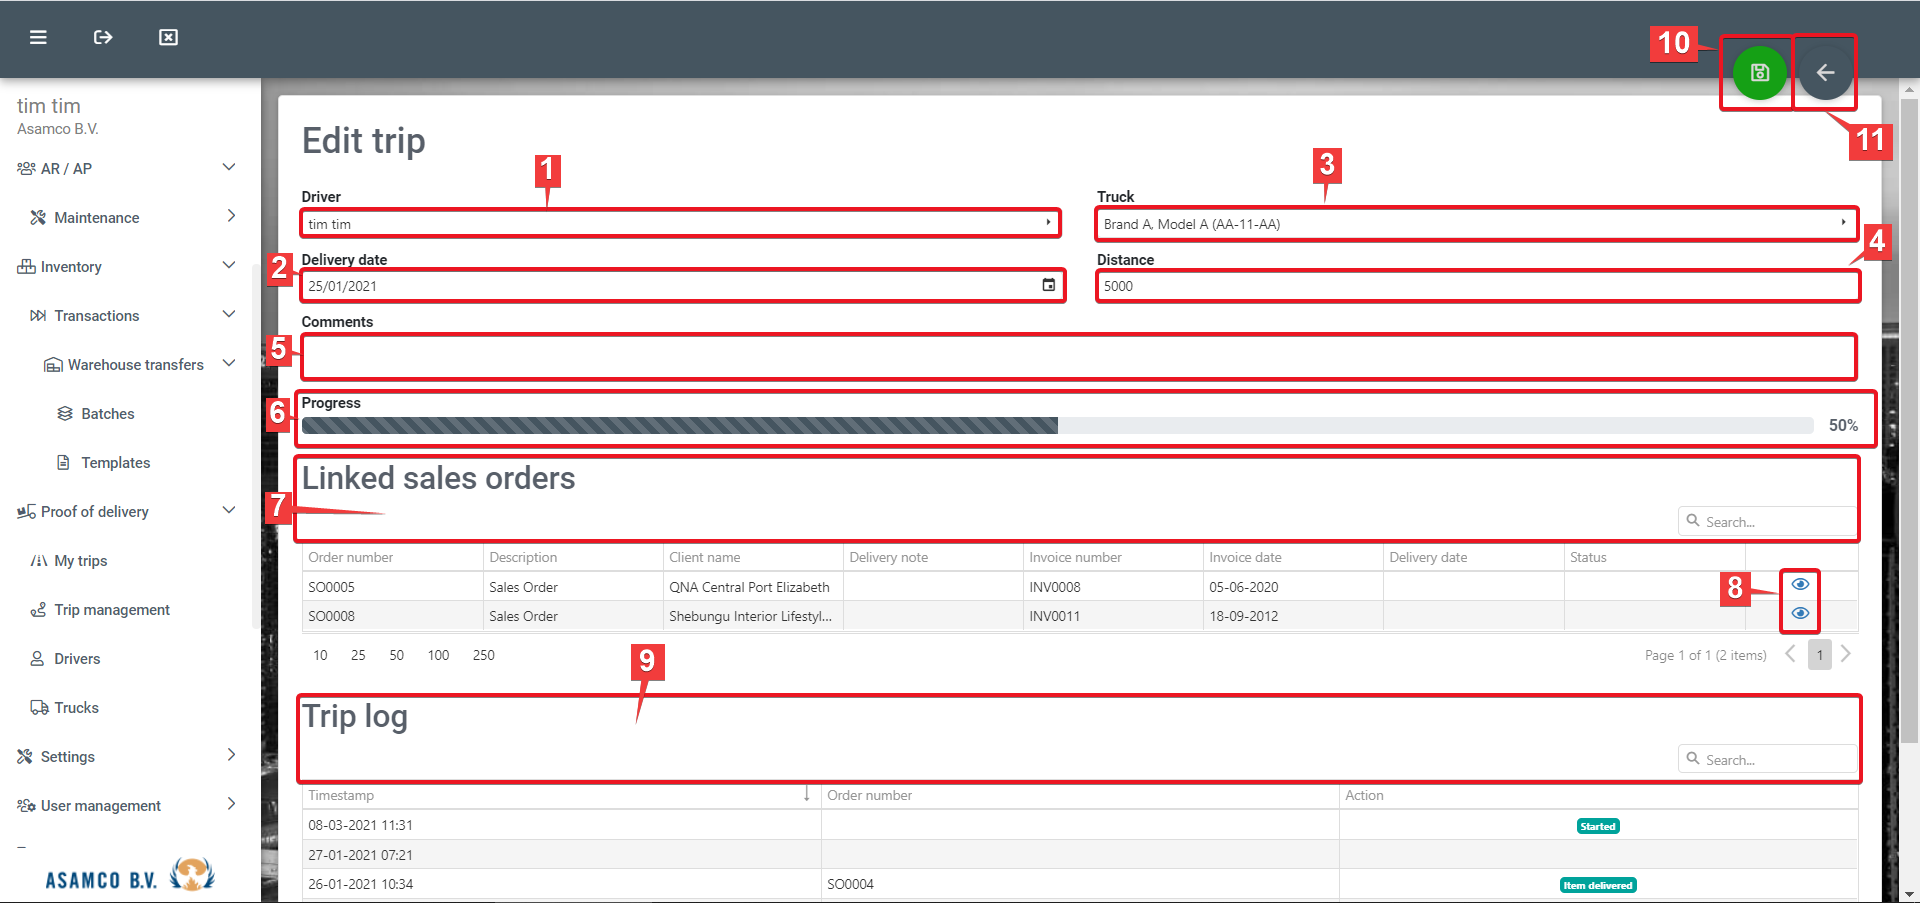
- Driver: Using this field, a driver can be linked to the trip.
- Delivery date: A delivery date for the trip can be set.
- Truck: Using this field, a vehicle can be linked to the trip.
- Distance: In this field the distance for the trip can be entered.
- Comments: In this field any additional relevant information can be entered.
- Progress: The progress line shows the percentage completion of the trip in question.
- Linked sales orders' search: The “Search” field can be used to filter the visible sales orders.
- View documents: Using this button the linked sales orders can be reviewed.
- Trip log' search: The “Search” field can be used to filter the visible trip logs.
Save: Using this button, the information entered can be saved.
Go back to the overview
Under "Drivers" a list of the existent drivers is displayed. The following options are available:
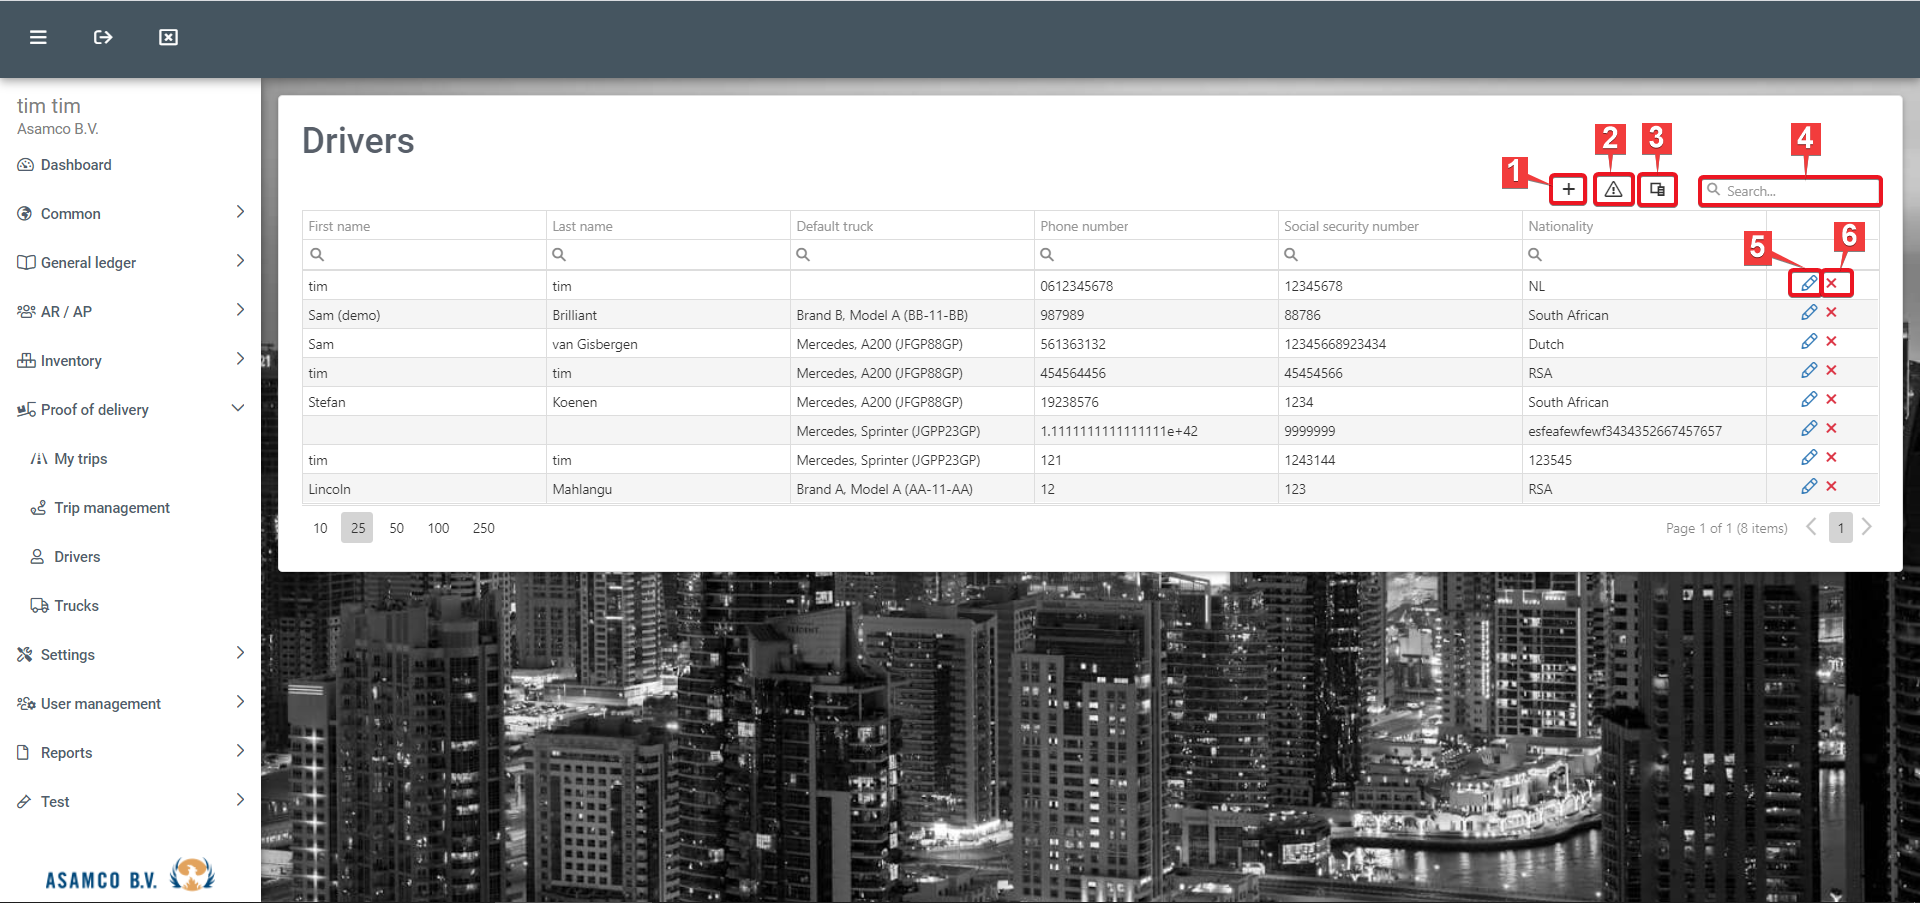
- Add: Using this function, new drivers can be added to the system.
- Reset layout: Using this function resets the layout, e.g. when changes have been made.
- Column chooser: Using this function allows for the management of columns visible within the overview. Columns can be added, using the checkbox in front of each option (see image below).
- Search: The “Search” field can be used to filter the visible drivers.
- Edit: Using this button, existent drivers' information can be edited.
- Remove: Using this button, existent drivers can be removed from the system.

When adding a new driver and/or editing an existing one, the following options are available:
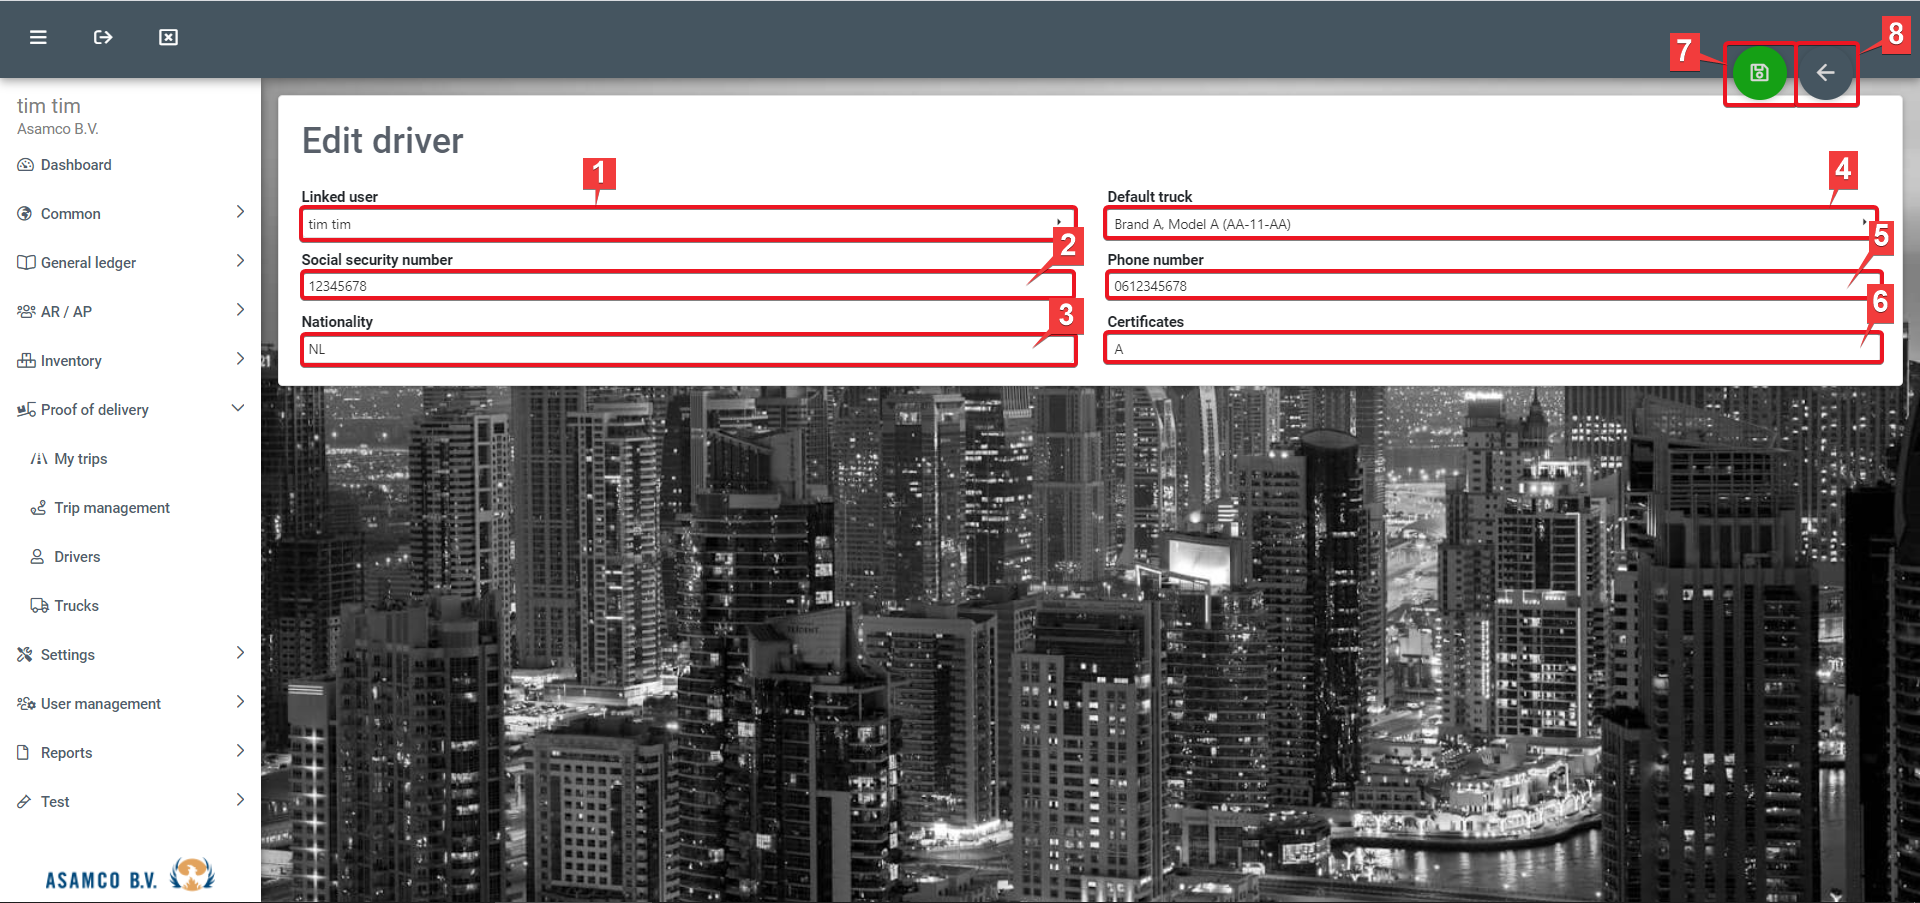
- Linked user: Using this field, the according driver can be selected.
- Social security number: In this field the social security number of the relevant driver is to be provided.
- Nationality: In this field the nationality of the driver is to be set.
- Default truck: In this field a default vehicle can be linked to the chosen driver.
- Phone number: In this field the phone number of the driver is to be provided.
- Certificates: In this field any available certificates are to be listed.
- Save: Using this button, the entered information can be saved.
- Go back
Under "Trucks" a list of the existent vehicles is displayed. The following options are available:
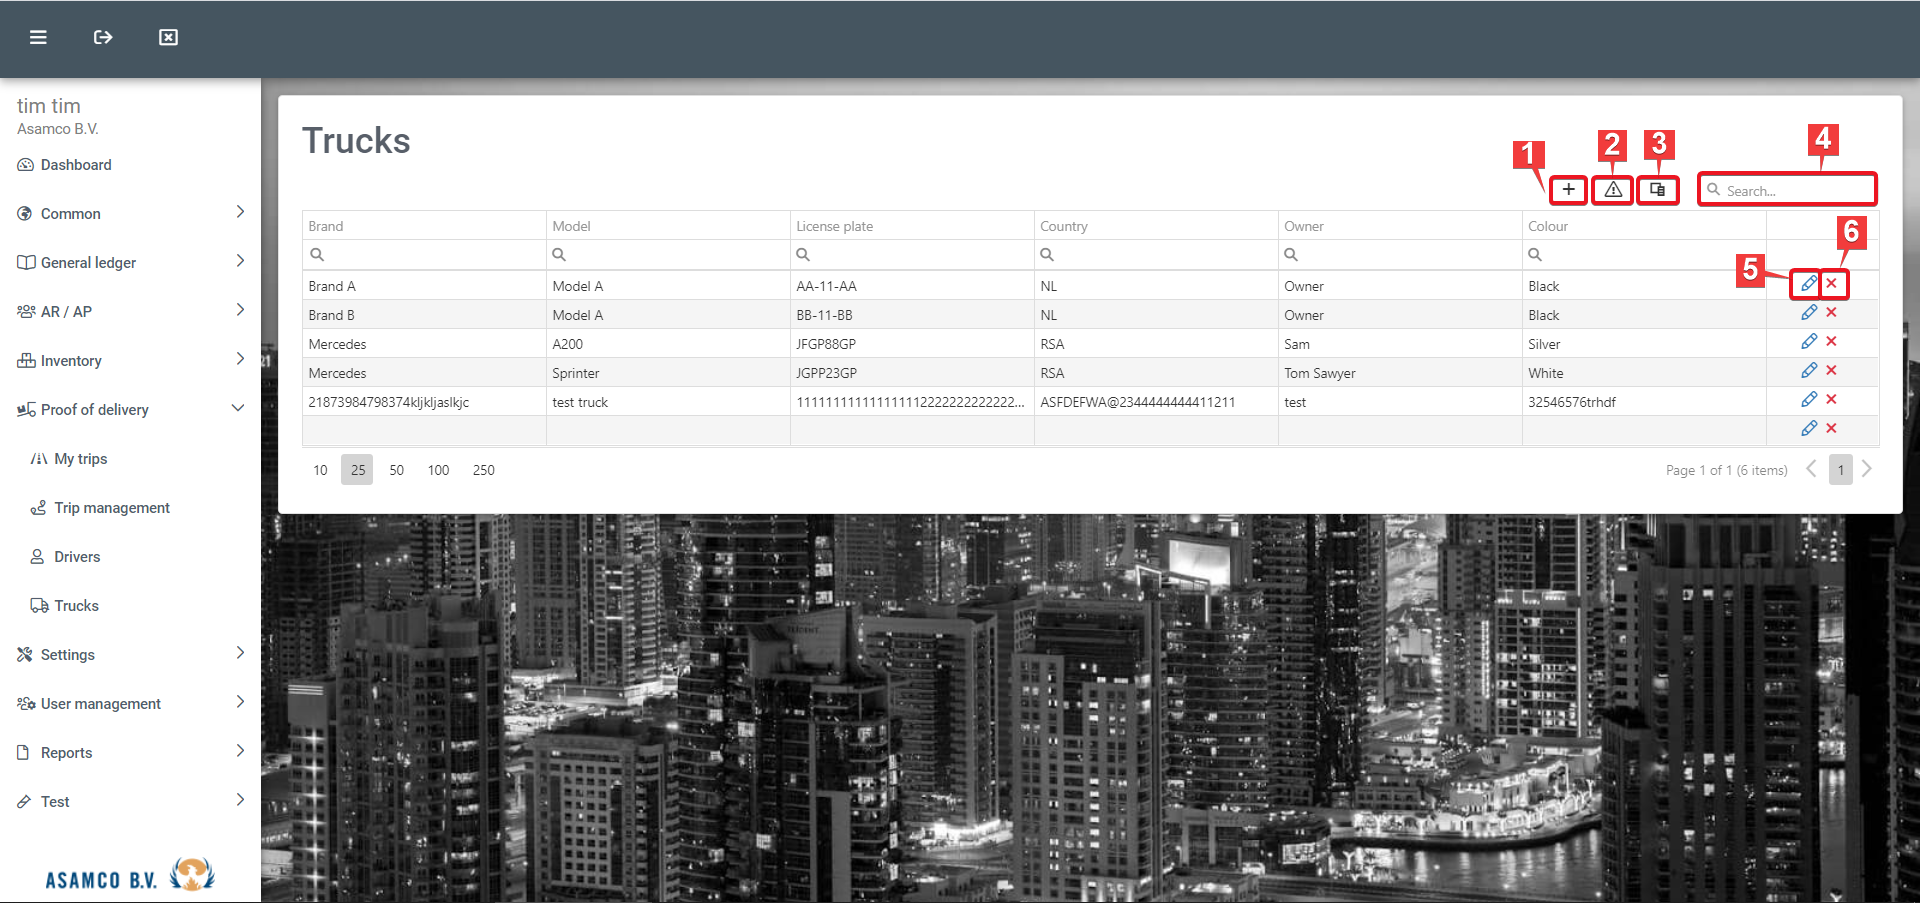
- Create truck: Using this function, new vehicles can be added to the system.
- Reset layout: Using this function resets the layout, e.g. when changes have been made.
- Column chooser: Using this function allows for the management of columns visible within the overview. Columns can be added, using the checkbox in front of each option (see image below).
- Search: The “Search” field can be used to filter the visible vehicles.
- Edit: Using this button, existent vehicles' information can be edited.
- Remove: Using this button, existent vehicles can be removed from the system.

When adding a new vehicle and/or editing an existing one, the following options are available:
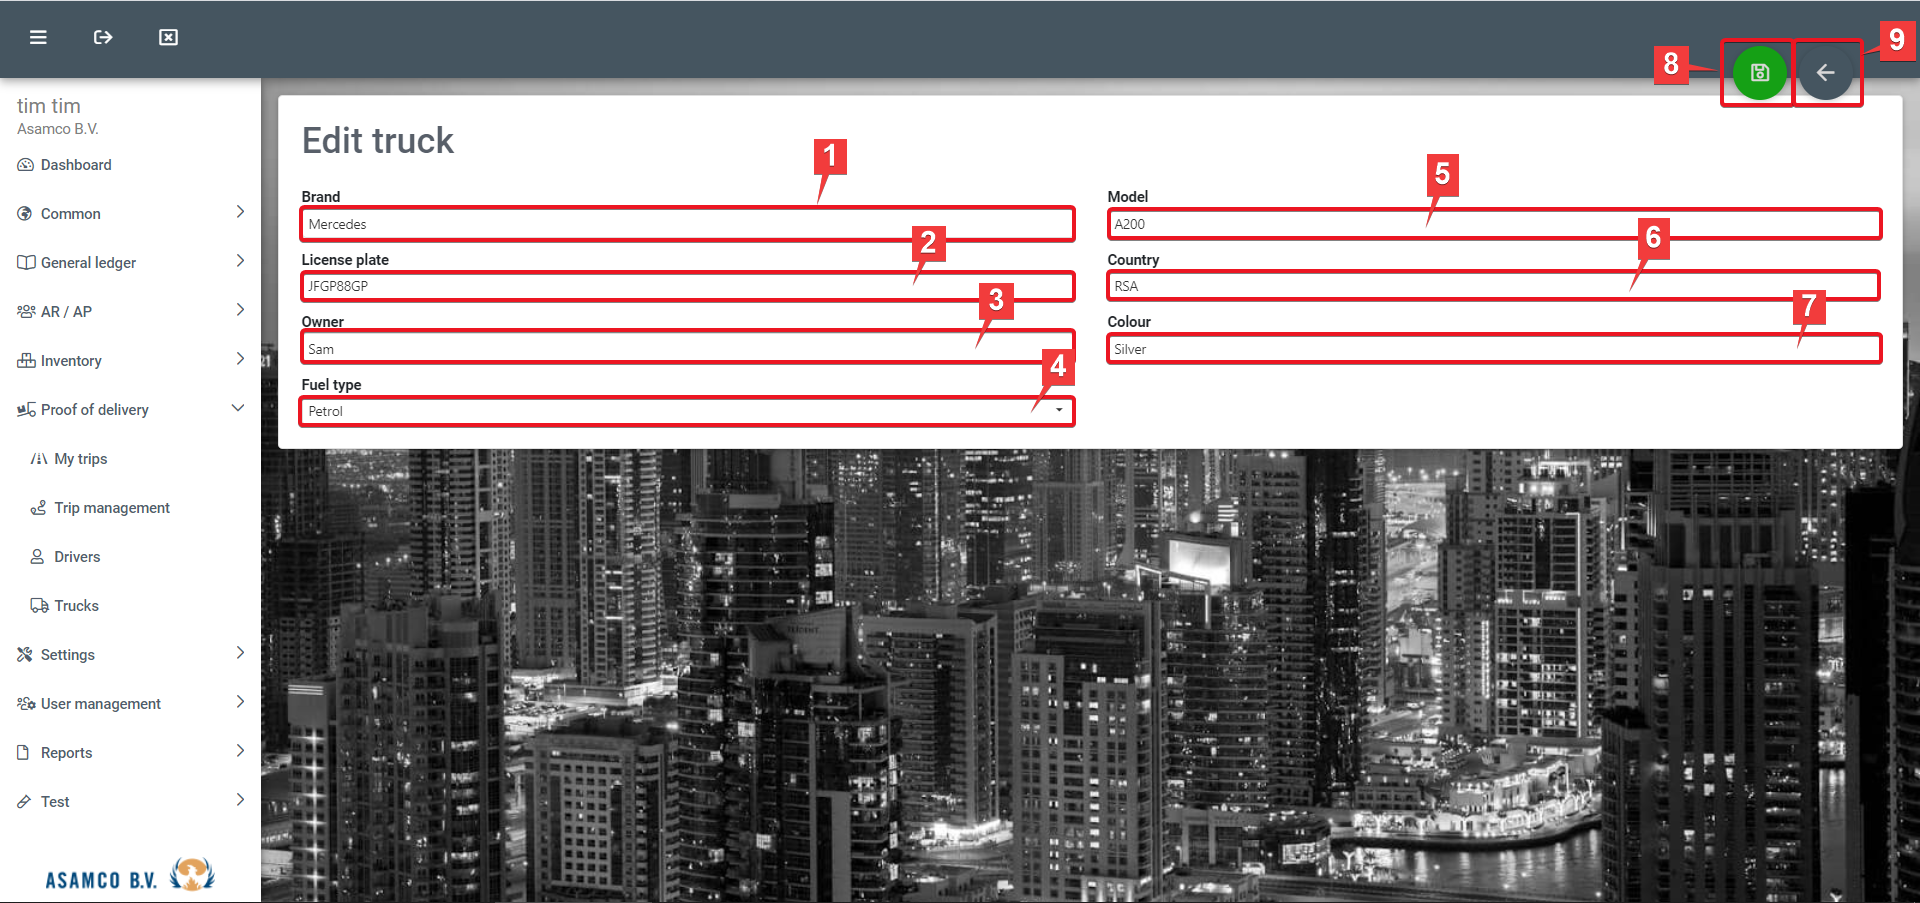
- Brand: Using this field, the brand of the vehicle can be selected.
- License plate: In this field the license plate of the relevant vehicle is to be provided.
- Owner: In this field the owner of the vehicle is to be set.
- Fuel type: In this field the default fuel type of the vehicle is to be set.
- Model: In this field the model of the car is to be provided.
- Country: In this field the registration country of the vehicle is to be provided.
- Colour: In this field the colour of the vehicle is to be specified.
- Save: Using this button, the entered information can be saved.
- Go back
10. Inner app reporting
Under "APIs & Datareaders" a list of those can be found. The following options are available:
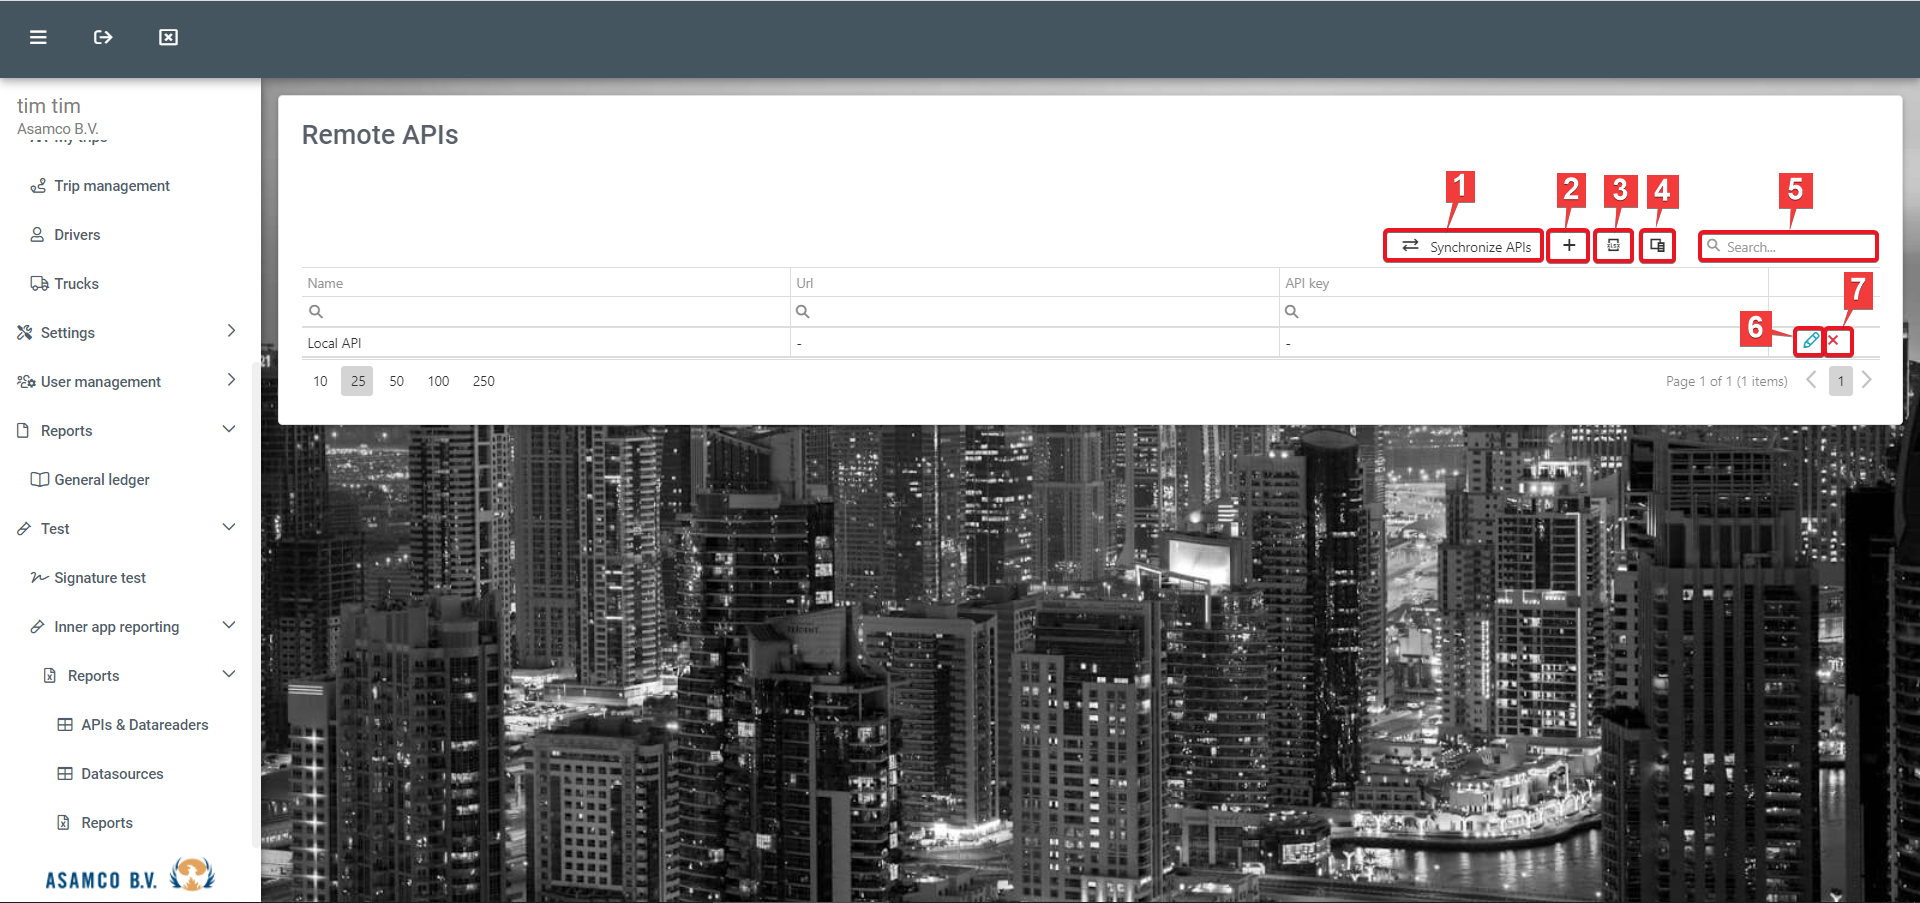
- Synchronize APIs: Using this button, APIs can be synchronized.
- Add: Using this button new APIs can be added.
- Export all data: Using this function the displayed data can be exported to Excel.
- Column chooser: Using this function allows for the management of columns visible within the overview. Columns can be added by dragging the desired column from the “Column chooser” box to the desired position in the overview (see image below).
- Search: The “Search” field can be used to filter the visible APIs.
- Edit: Using this button, existent APIs can be edited.
- Delete: Using this button, existent APIs can be removed.

Under "Datasources" the list of existent data sources is displayed. The following functions are further available:
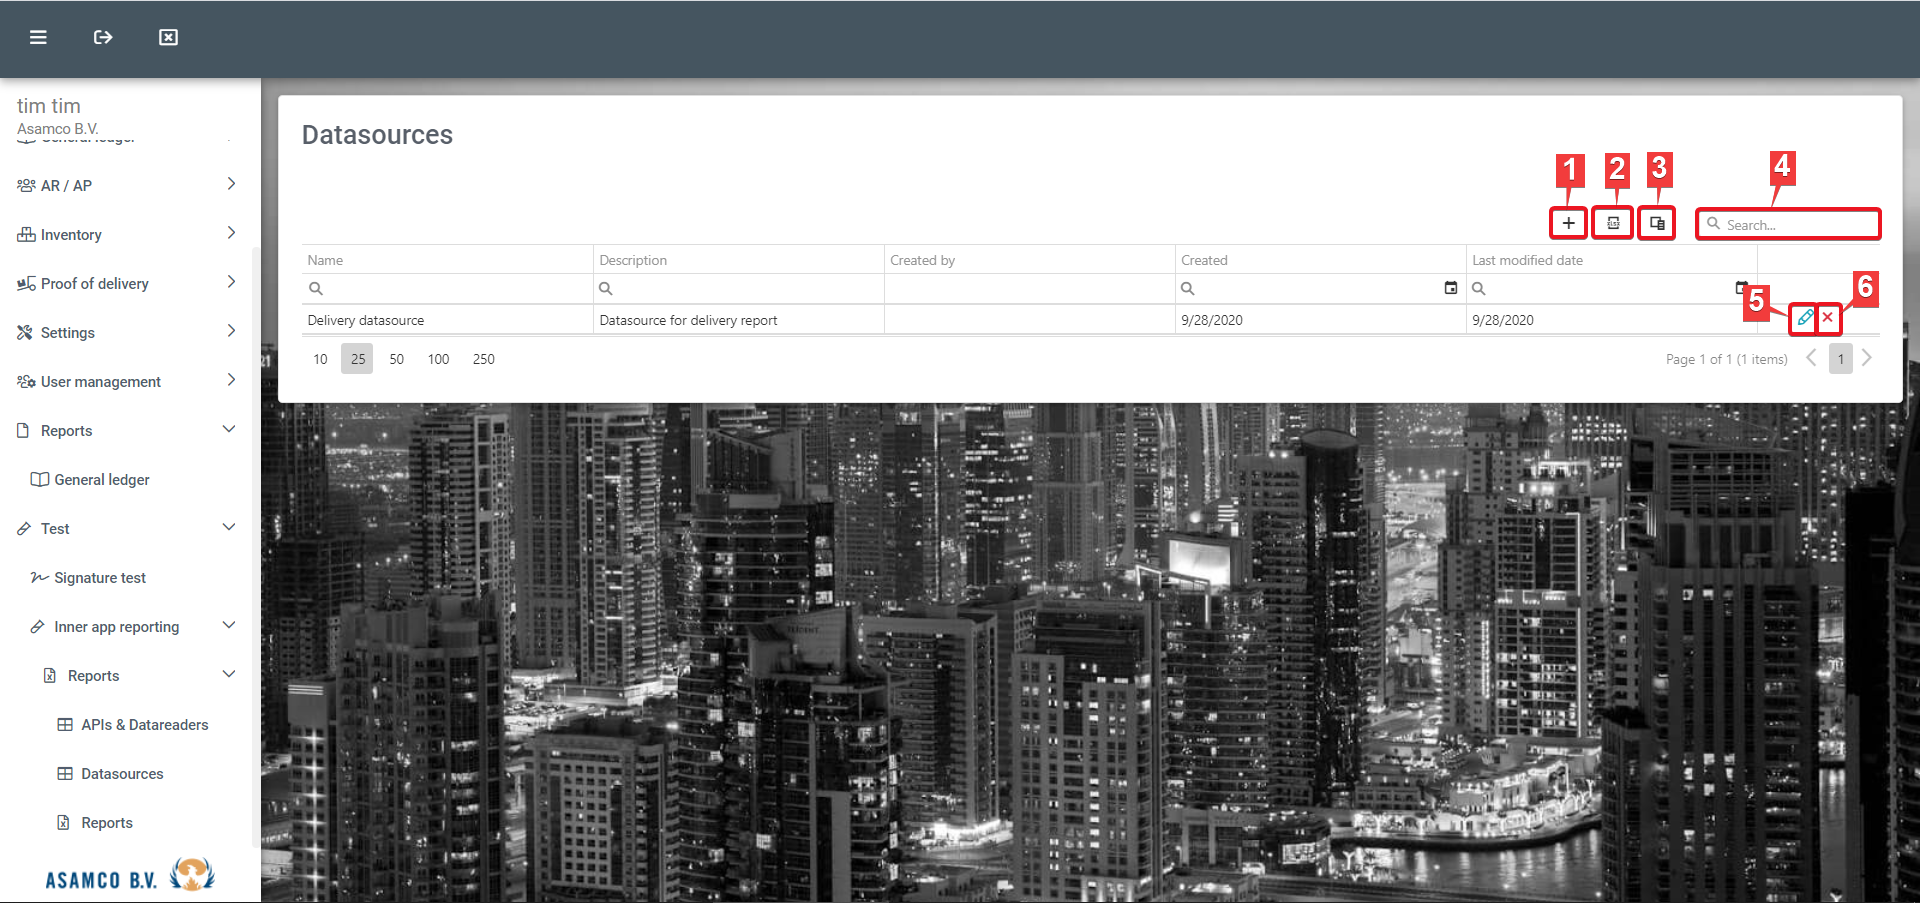
- Add: Using this button new data sources can be added.
- Export all data: Using this function the displayed data can be exported to Excel.
- Column chooser: Using this function allows for the management of columns visible within the overview. Columns can be added by dragging the desired column from the “Column chooser” box to the desired position in the overview (see image below).
- Search: The “Search” field can be used to filter the visible data sources.
- Edit: Using this button, existent data sources can be edited.
- Delete: Using this button, existent data sources can be removed.

Under “Reporting”, a list of the reports to which the user has access can be found. The following functions are available:
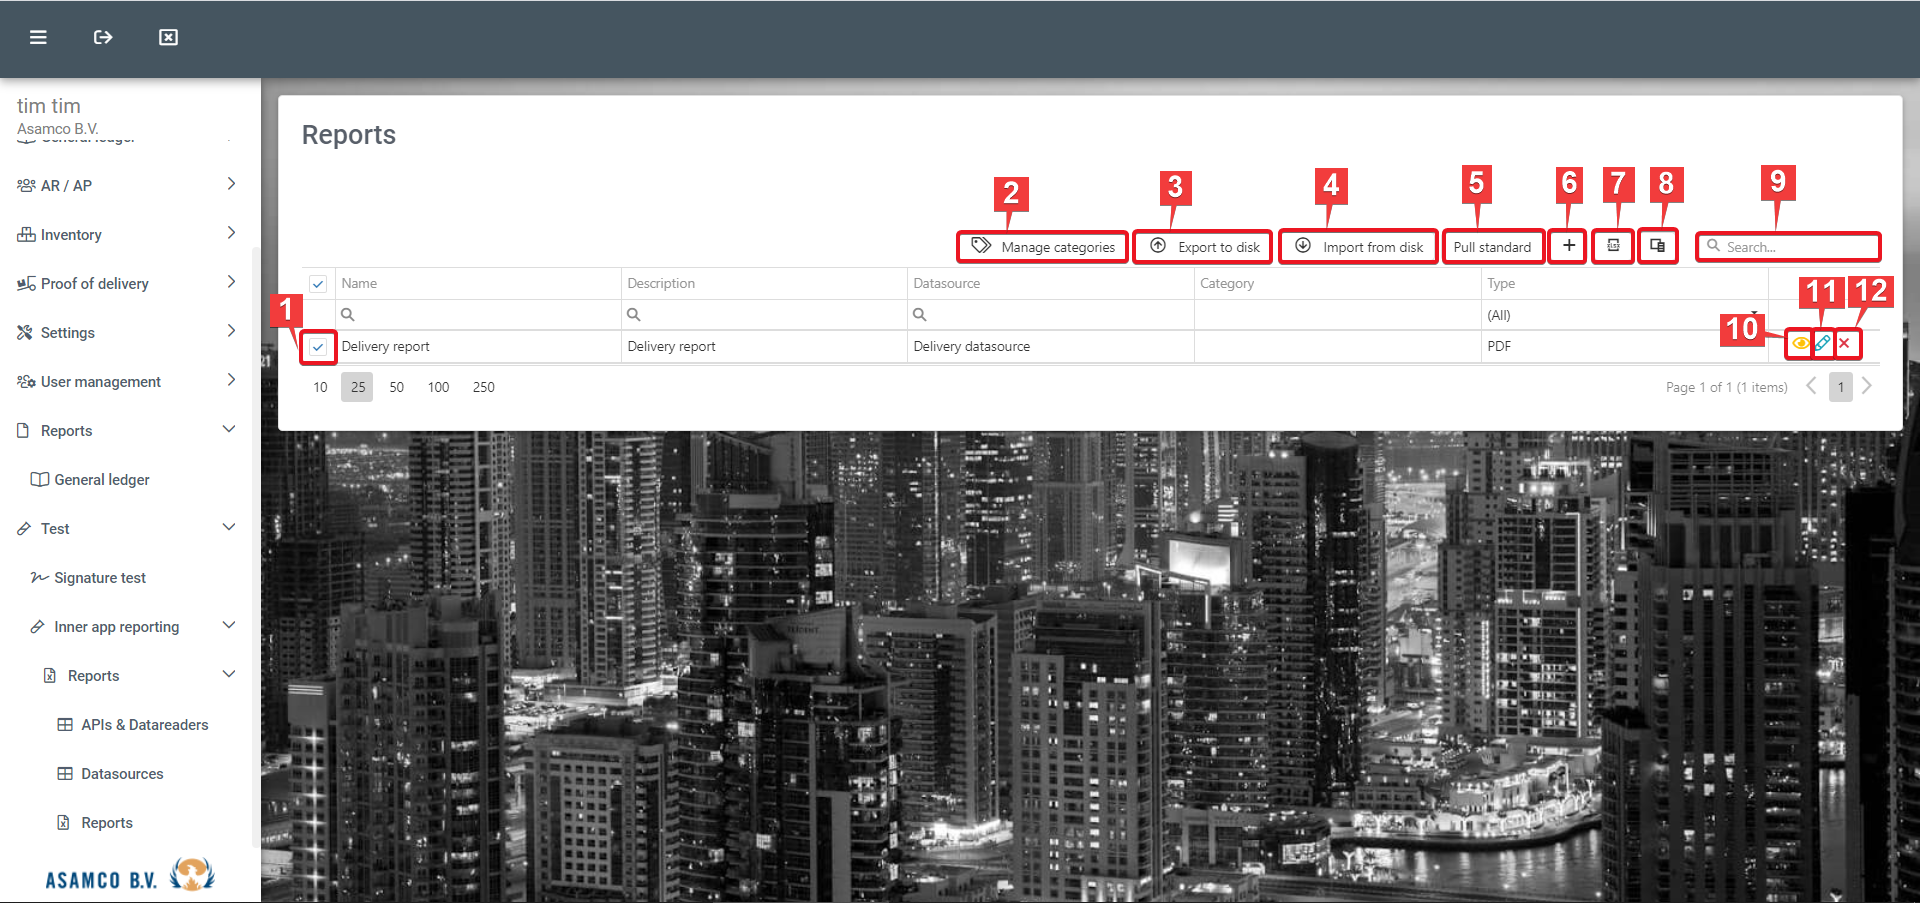
- Select reports: Reports can be selected, using the checkboxes in front of each report.
- Manage categories: Report categories can be added, edited and/or deleted, using this button.
- Export to disk: Using this button, the selected reports (1) can be downloaded.
- Import from disk: Using this button, reports can be uploaded to the system.
- Pull standard
- Add: Using this button, new reports can be created.
- Export all data: Using this function the displayed data can be exported to Excel.
- Column chooser: Using this function allows for the management of columns visible within the overview. Columns can be added by dragging the desired column from the “Column chooser” box to the desired position in the overview (see image below).
- Search: The “Search” field can be used to filter the visible reports.
- View report: Using this button, the according report can be generated and reviewed/downloaded.
- Edit: Using this button, the according report can be edited.
- Delete: Using this button, the according report can be removed.
